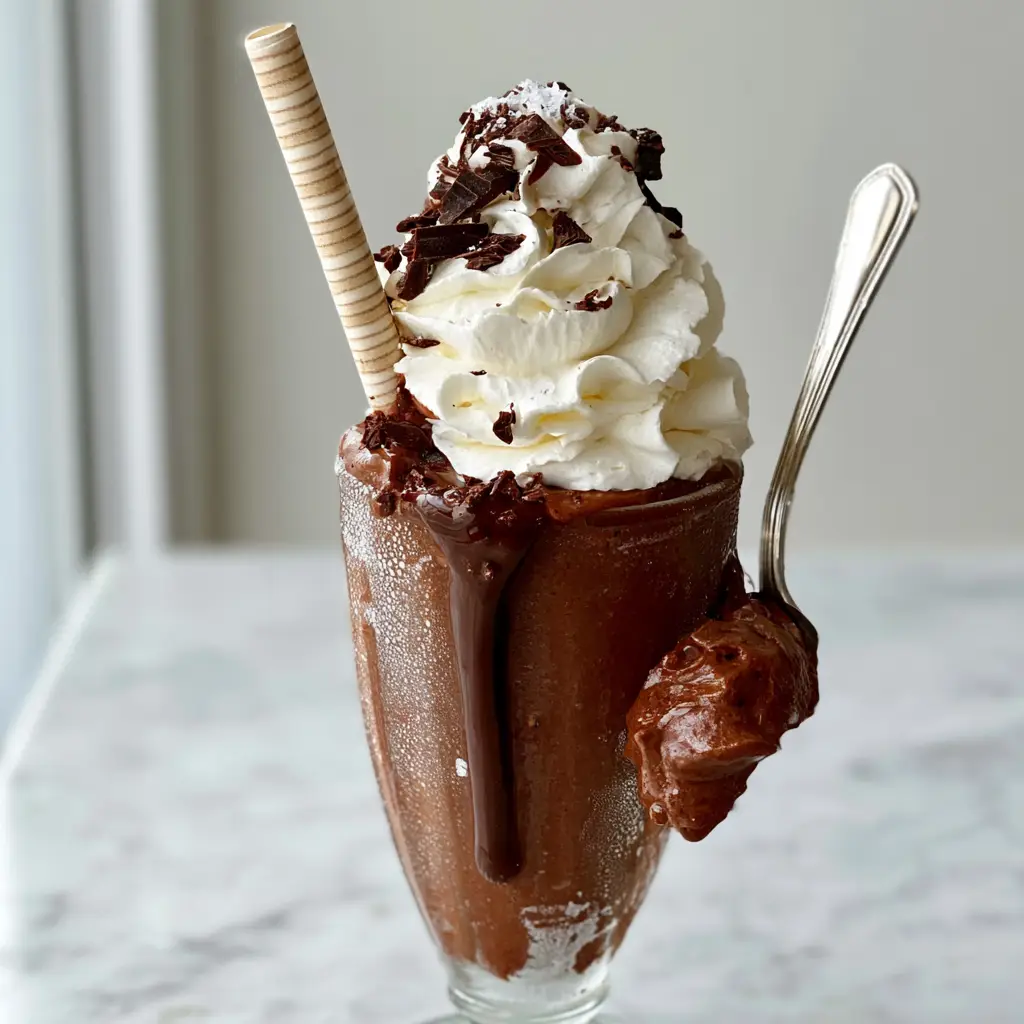
There is a profound difference between a standard diner drink and the professional results found in elite chocolate milkshake recipes. This version is a masterclass in texture, utilizing a “dry-blend” technique to achieve a viscosity so dense it can support a heavy silver spoon without dripping.
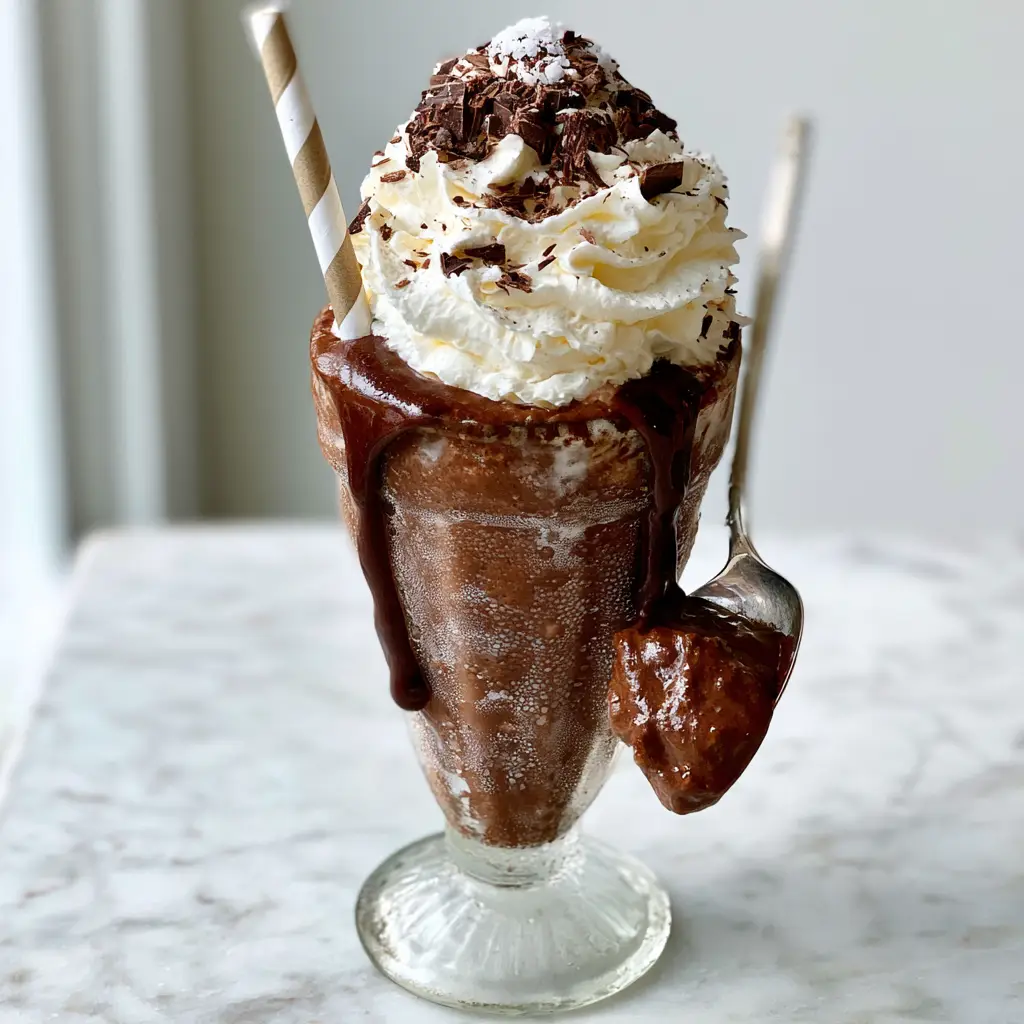
Imagine a tall, vintage soda fountain glass, its exterior kissed by a fine layer of frost and delicate beads of condensation. Inside, a dark, velvety landscape of premium cocoa and frozen whole milk creates a base that is both intensely chocolaty and incredibly smooth.
This recipe isn’t just about mixing; it’s about culinary architecture, from the internal chocolate ganache drizzle to the massive, structured swirl of vanilla whipped cream. We are building a dessert that is as much a visual experience as it is a nostalgic indulgence.
The Anatomy of a Professional-Grade Milkshake
To move beyond basic chocolate milkshake recipes, we must focus on the structural integrity of the ingredients. The goal is a shake that resists a straw and holds its shape, providing a cooling sensation that lingers on the palate.
- Structural Density: We avoid liquid milk in the final blend, using frozen milk cubes to prevent the “watered-down” effect of traditional ice.
- Visual Contrast: High-gloss chocolate ganache against the matte, dense shake creates a professional, multi-dimensional appearance.
- Textural Balance: The addition of flaky sea salt cuts through the richness, while dark chocolate curls provide a necessary crunch.
- Whipped Stability: We utilize a stiff-peak whipped cream method to ensure the topping remains upright and massive.
Essential Components for the Ultimate Chocolate Base
Whole Milk (Frozen into Cubes): 2 cups (480ml) of whole milk. By freezing the milk into cubes, you eliminate the need for ice, which often dilutes the intensity of the chocolate.
Premium Dark Cocoa Powder: 1/2 cup (45g) of high-quality Dutch-processed cocoa. This provides the deep, dark hue and a sophisticated bitterness that balances the sweetness of the ice cream.
Heavy Chocolate Ice Cream: 3 large scoops (approx. 450g) of premium, high-fat chocolate ice cream. This acts as the primary binder and provides the “heavy chocolate base” required for that signature thickness.
Chocolate Ganache Drizzle: 1/4 cup (60ml) of semi-sweet chocolate melted with 2 tbsp (30ml) of heavy cream. This is painted onto the inner walls of the glass for a striking visual and a rich, fudgy bite.
Heavy Whipping Cream: 1/2 cup (120ml) chilled cream beaten to stiff peaks. This creates the “massive, structured swirl” that sits atop the shake like a crown.
Dark Chocolate Curls: 2 tbsp (15g) of hand-shaved dark chocolate. These provide the “heavy dark chocolate shavings” seen in professional food photography.
Flaky Sea Salt: A generous pinch (approx. 1/4 tsp). This “single touch of flaky sea salt” is the secret weapon for elevating the cocoa notes.
Precision Tools for a Soda Fountain Finish
To achieve the results seen in our specialized drink guides, you will need a high-power blender. A standard blender may struggle with the “dry-blend” thickness, so use a tamper if available.
You will also need a vintage soda fountain glass, which should be placed in the freezer for at least 30 minutes before serving. This ensures the realistic condensation and frost described in our visual blueprint.
A hand mixer or stand mixer is required for the whipped cream to reach those specific stiff peaks. Finally, a vegetable peeler is the best tool for creating those thick, dramatic chocolate curls from a room-temperature chocolate bar.
The Culinary Process: Crafting the Masterpiece
Preparing the Frozen Foundation
Start by pouring your 2 cups (480ml) of whole milk into a standard ice cube tray. Freeze for at least 4 hours, or until completely solid; this is the key to all high-density chocolate milkshake recipes.
While the milk freezes, prepare your ganache by melting the chocolate and cream together in 20-second bursts in the microwave. Stir until a glossy, thick ribbon forms that falls slowly from the spoon.
Building the “Dry-Blend” Texture
Place your frosted glass back in the freezer. In your blender, combine the frozen milk cubes, the Dutch-processed cocoa powder, and the heavy chocolate ice cream.
Blend on the lowest setting, using a tamper to push the ingredients into the blades. Listen for the sound of the motor—it should sound heavy and labored; this indicates you are achieving that non-dripping, thick consistency.
The Art of the Glass and Garnish
Remove the glass from the freezer; it should be visibly frosted. Use a spoon to drizzle the warm chocolate ganache down the inner walls in thick, vertical ribbons.
Spoon the milkshake into the glass—you will notice it resists the spoon, requiring a bit of pressure to settle. Insert a thick striped paper straw; it should stand perfectly upright without leaning.
Pipe the stiff-peak vanilla whipped cream in a high, circular motion, creating a massive swirl. Finish with the dark chocolate shavings and the single touch of flaky sea salt.
Expert Tips for a Professional Result
- The Frost Factor: Never skip the glass chilling step; the temperature difference creates those beautiful condensation beads that make the drink look irresistible.
- Cocoa Blooming: For an even deeper flavor, whisk the cocoa powder into a tiny amount of warm ganache before adding it to the blender.
- The Spoon Test: A truly successful gourmet shake should be able to hold a silver spoon upright. If it’s too thin, add more frozen milk cubes rather than ice.
- Vanilla Enhancement: Add 1/2 tsp (2.5ml) of vanilla bean paste to your whipped cream for those visible black specks and a premium flavor profile.
Storage and Make-Ahead Advice
Chocolate milkshake recipes are best enjoyed immediately to appreciate the temperature contrast between the frozen shake and the room-temperature ganache. However, you can prep components in advance.
The milk cubes can be stored in an airtight bag in the freezer for up to two weeks. The chocolate ganache can be kept in the refrigerator and gently reheated when you are ready to assemble your dessert masterpiece.
If you find yourself with leftovers, pour the mixture into a mold to create “milkshake pops.” For more frozen inspiration, check out our guide on homemade fruit-based frozen treats.
What to Serve With Your Gourmet Shake
Because this milkshake is incredibly rich, it pairs beautifully with salty or savory counterpoints. Consider serving it after a light summer meal like our citrus-marinated grilled chicken or a vibrant coconut rice bowl.
For a true “diner-at-home” experience, pair this shake with salty snacks or a savory pasta like our savory caramelized onion noodles. The salt in the food will heighten the sweetness and cocoa depth of the shake.
Frequently Asked Questions
Yes, but you may need to let the milk cubes sit at room temperature for 2-3 minutes before blending and use a sturdy spatula to manually stir the mixture between pulses to achieve the desired thickness.
The key is minimizing liquid. By using only frozen components (ice cream and milk cubes) and a high-power blender with a tamper, you create a high-viscosity ‘dry blend’ that is significantly thicker than standard shakes.
Ensure your whipped cream is beaten to ‘stiff peaks’ and that the milkshake itself is as thick as possible. Chilling the glass beforehand also creates a thermal barrier that helps the topping stay structured.
Dutch-processed cocoa powder is best. It has been treated to reduce acidity, resulting in a darker color and a smoother, more mellow chocolate flavor that pairs perfectly with dairy.
Ice dilutes the flavor as it melts. Frozen milk cubes provide the necessary chill and structure while maintaining a rich, creamy flavor profile without watering down the cocoa.
The Definitive Thick Chocolate Milkshake Recipe
Chocolate Milkshake Recipes: The Ultra-Thick Gourmet Masterpiece
Ingredients
Equipment
Method
- Pour whole milk into ice cube trays and freeze until solid, at least 4 hours.
- Place a vintage soda fountain glass in the freezer for at least 30 minutes until a layer of frost forms.
- Melt chocolate and 2 tbsp cream together until smooth. Drizzle vertical ribbons down the inner walls of the chilled glass.
- Combine frozen milk cubes, cocoa powder, and ice cream in a blender. Process until incredibly thick and velvety; the motor should sound labored.
- Spoon the shake into the glass. Pipe a massive swirl of stiff-peak whipped cream on top. Garnish with dark chocolate shavings and a touch of sea salt.
Notes
Use a vegetable peeler on a room-temp chocolate bar to get large, dramatic curls.
Closing & Call to Action
Mastering the art of professional chocolate milkshake recipes allows you to bring the luxury of a high-end creamery into your own kitchen. The combination of frozen milk cubes and premium cocoa creates a texture that is truly world-class.
If you enjoyed this deep dive into dessert architecture, please leave a comment below and let us know how your “spoon test” went! Don’t forget to follow katieplates on Pinterest and share your creations using our recipes.