There is a specific sensory magic that happens when high-heat flames meet a sugar-rich glaze on skin-on chicken. If you have ever walked through a roadside market in Hawaii, the scent of charcoal and caramelized pineapple juice is unmistakable. This Huli Huli Chicken recipe is designed to replicate that exact experience, delivering a dish that looks as incredible as it tastes.
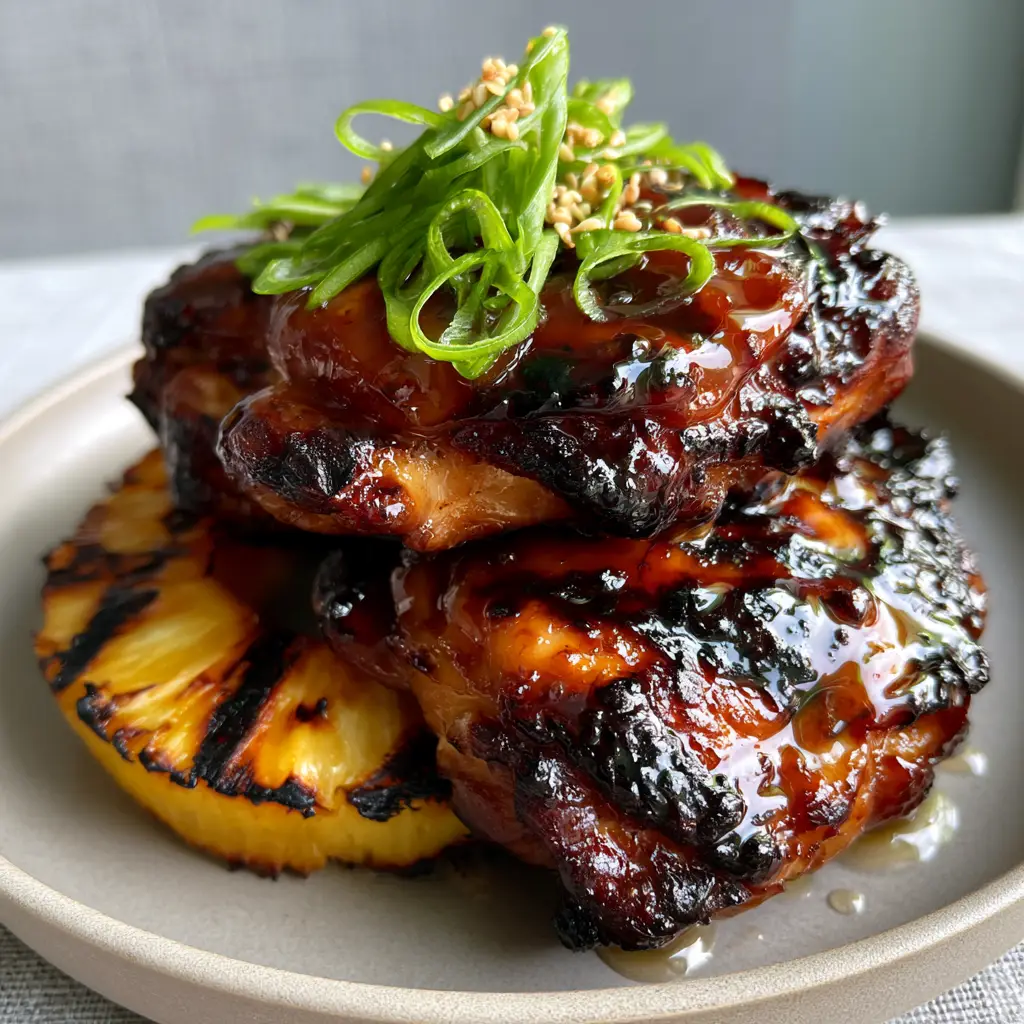
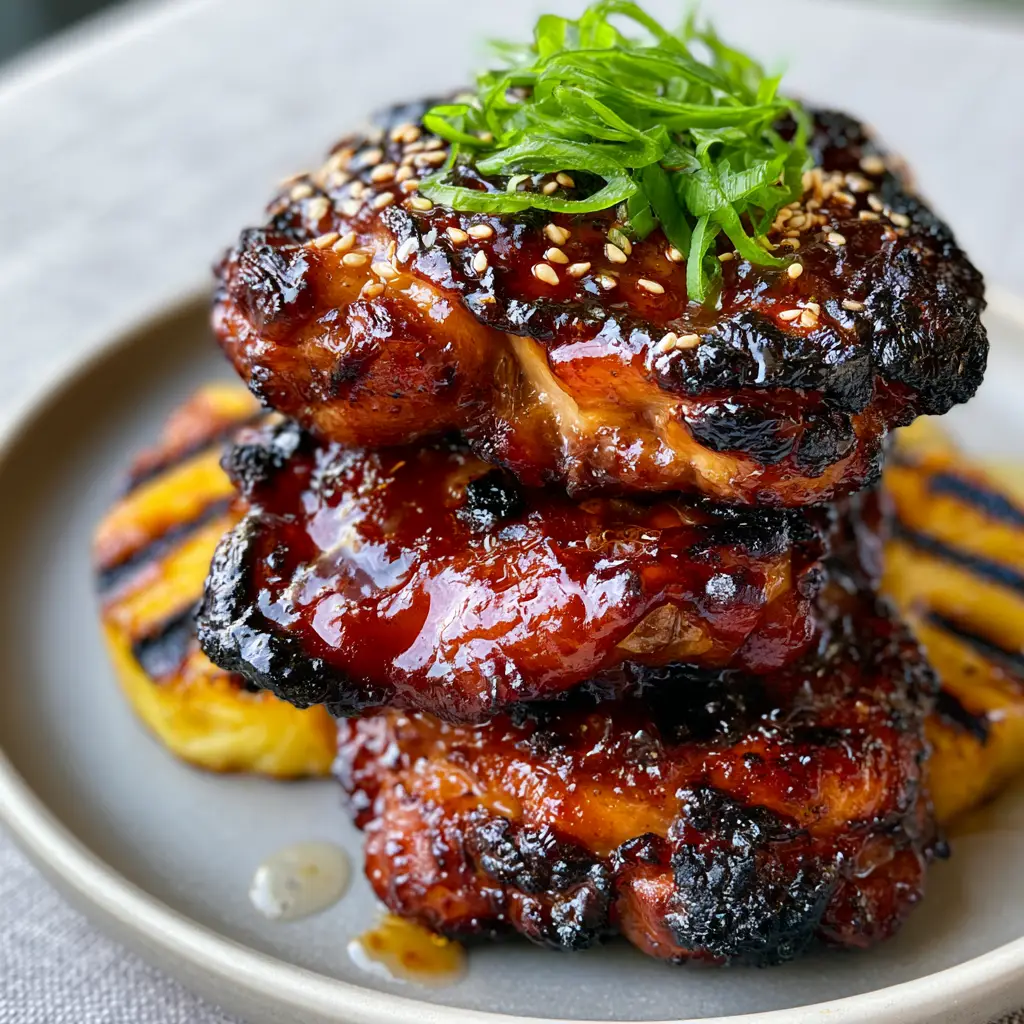
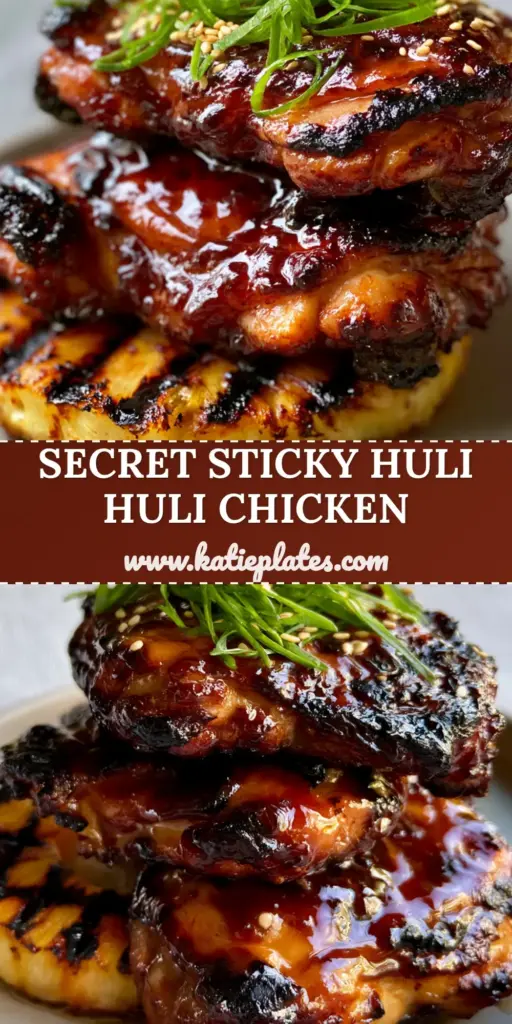
We are aiming for a very specific visual: three stacked, artfully arranged thighs with a bubbling, translucent glaze that looks like liquid mahogany. The skin should be crispy with deep charred edges, contrasted by the bright green of paper-thin scallions and the crunch of toasted sesame seeds. It is a handheld-photo-ready masterpiece that brings the island sun to your dinner table.
By mastering the “huli” (which means “turn” in Hawaiian) technique, you ensure the meat stays incredibly juicy while the exterior develops a sticky, savory crust. This isn’t just a grilled chicken recipe; it is a lesson in flavor layering and temperature control. Get ready to create the most photogenic and delicious chicken you have ever prepared at home.
Why You Will Love This Bubbling Mahogany Hawaiian Chicken
- The Perfect Visual Contrast: The deep, dark mahogany glaze pops against the bright white of the toasted sesame seeds and the vibrant green of the scallion rings.
- Shatter-Crisp Skin: By using skin-on thighs, we achieve a texture that ranges from sticky and chewy to perfectly charred and crispy at the edges.
- The “Huli” Technique: Constant turning allows the glaze to build in translucent layers rather than burning, creating a thick, bubbling coating.
- Balanced Flavor Profile: A scientific balance of salt (soy), acid (pineapple juice), and heat (ginger) ensures the sweetness never becomes cloying.
The Anatomy of an Authentic Mahogany Huli Huli Glaze
Creating a glaze that is “bubbling and translucent” requires more than just mixing ingredients; it requires understanding the reduction process. Every ingredient in this list serves a functional purpose in achieving the visual and structural results seen in our blueprint.
Bone-In, Skin-On Chicken Thighs (approx. 2 lbs / 900g): The skin is the canvas for our mahogany glaze. Without the skin, you lose the ability to create those signature crispy charred edges that define high-end Hawaiian BBQ.
Unsweetened Pineapple Juice (2 cups / 480ml): This provides the natural sugars for caramelization and the bromelain enzymes that help tenderize the chicken. It is the backbone of the “island” flavor profile.
Shoyu or High-Quality Soy Sauce (1 cup / 240ml): This provides the deep umami base and the dark pigment necessary for that mahogany color. It also seasons the meat deeply through the marinade process.
Packed Light Brown Sugar (1/2 cup / 100g): Sugar is essential for the “bubbling” effect on the grill. It lowers the smoke point of the sauce just enough to create those beautiful black grill marks and sticky texture.
Fresh Grated Ginger (2 tbsp / 12g): Ginger adds a sharp, aromatic bite that cuts through the richness of the chicken skin. It also provides tiny textural flecks in the translucent glaze.
Fresh Minced Garlic (4 cloves / 12g): Garlic provides a foundational savory note. As it grills, it becomes sweet and mellow within the glaze layers.
Rice Vinegar (1/4 cup / 60ml): This acid balances the sugar, ensuring the glaze is vibrant. It also helps the glaze “set” on the chicken surface so it doesn’t just slide off into the coals.
Ketchup (1/4 cup / 60ml): While it may seem modern, ketchup adds tomato solids and vinegar that contribute to the thick, translucent body of the final sauce. It acts as a binder for the other liquids.
Toasted Sesame Oil (1 tsp / 5ml): Just a hint of oil adds a glossy sheen to the final dish, creating those specular highlights when the light hits the stacked thighs.
Cornstarch Slurry (1 tbsp / 8g cornstarch + 1 tbsp / 15ml water): This is our secret weapon for the “bubbling, translucent” look. It thickens the basting sauce so it clings to the chicken in a thick, mahogany layer.
Garnish Essentials: You will need 2 large scallions, sliced into paper-thin rings, and 1 tbsp (9g) of toasted white sesame seeds. These provide the visual “finish” that signals a professional-level dish.
Fresh Pineapple Slices (4-6 rings): These are grilled alongside the chicken to provide a charred, acidic accompaniment. Look for distinct black grill marks to contrast the yellow fruit.
Essential Tools for Mastering the Hawaiian Grill
To achieve the “Extreme Close-Up” quality of our visual blueprint, you need the right equipment to manage heat and texture. A standard backyard grill works perfectly, provided you have the following additions.
A heavy-duty set of long-handled tongs is non-negotiable for the “huli” (turning) process. You will be flipping the chicken every 3-5 minutes to build the glaze, so a secure grip is vital to prevent tearing the skin.
A silicone basting brush is superior to a bristle brush here. It allows you to “paint” the thick glaze onto the chicken in heavy layers, ensuring that bubbling, translucent appearance once it hits the heat.
If you are working with pan-seared chicken thighs often, you know the value of a digital meat thermometer. For Huli Huli, we want an internal temperature of 175°F (80°C). Unlike breasts, thighs benefit from a higher temp to break down connective tissue, keeping them juicy.
Step-By-Step: Engineering the Mahogany Huli Huli Chicken
Phase 1: The Flavor Infusion Marinade
In a large bowl, whisk together the pineapple juice, soy sauce, brown sugar, ketchup, rice vinegar, ginger, garlic, and sesame oil. Reserve 1 cup (240ml) of this mixture in a small saucepan—this will become our thick basting glaze later.
Place the chicken thighs in a gallon-sized bag and pour in the remaining marinade. Press out the air and seal. Let the chicken marinate in the refrigerator for at least 4 hours, though 8 to 12 hours is ideal for that deep mahogany penetration. This step is similar to how we prep our Greek chicken marinade to ensure flavor reaches the bone.
Phase 2: Reducing the Translucent Basting Glaze
Take the reserved 1 cup of marinade and bring it to a simmer over medium heat. In a small cup, mix your cornstarch and water to create a slurry. Whisk the slurry into the simmering sauce.
Continue to whisk for 2-3 minutes until the sauce coats the back of a spoon. It should be dark, glossy, and translucent. This thickness is what allows the glaze to “bubble” on the grill without running off, creating that artful, sticky coating seen in the photos.
Phase 3: The “Huli Huli” Grilling Process
Preheat your grill to medium-high heat (about 375°F / 190°C). Clean the grates thoroughly and lightly oil them to prevent the skin from sticking. This is crucial for maintaining the integrity of the skin for the final photo.
Place the chicken thighs on the grill, skin-side down. Grill for 5 minutes until you see the first signs of charred edges. Flip the chicken (“Huli!”). Generously brush the grilled side with your reduced glaze. Continue flipping and basting every 5 minutes.
As the chicken cooks, the sugars will begin to caramelize. Watch for visual cues: the glaze should be bubbling and turning a deep, rich mahogany. If the edges start to blacken too quickly, move the chicken to a slightly cooler part of the grill to finish cooking through.
Phase 4: Grilling the Pineapple and Finishing
During the last 5 minutes of grilling, place the pineapple rings directly onto the hottest part of the grate. Leave them undisturbed until distinct black grill marks form. Flip and repeat.
Check the chicken with your thermometer. Once it hits 175°F (80°C), remove it from the grill. Give it one final “vanity” coat of glaze while it is hot. This creates those specular highlights and the “tiny droplets of juice” described in our visual prompt.
Chef’s Tips for Visual and Flavor Perfection
- The “Vanity” Glaze: Always save a tablespoon of the glaze to brush on the chicken after it comes off the grill. This ensures a wet, glossy look for your presentation.
- Paper-Thin Scallions: Use a very sharp knife to slice your scallions as thinly as possible. Soak them in ice water for 5 minutes if you want them to curl into elegant rings.
- Temperature Safety: Always ensure your grill is hot before the chicken touches it. This “shocks” the skin, helping it render fat quickly and become crispy rather than rubbery.
- Rest Before Stacking: Let the chicken rest for 5 minutes before stacking. This allows the juices to redistribute so they don’t wash away the glaze when you cut into them.
Storage, Reheating, and Make-Ahead Advice
Huli Huli chicken is remarkably resilient. If you have leftovers, store them in an airtight container in the refrigerator for up to 4 days. The glaze will dull slightly as it cools, but the flavor remains intense.
To reheat, I recommend using an air fryer at 350°F (175°C) for 4-5 minutes. This helps re-crisp the skin and reactivates the sugars in the glaze. Avoid the microwave, as it will make the skin rubbery and the sauce soggy.
You can freeze the marinated (raw) chicken for up to 3 months. Simply thaw in the refrigerator overnight before grilling. This makes it a perfect option for meal prep when you want a high-end dinner on a weeknight.
What to Serve With This Mahogany Masterpiece
The sweet and salty profile of Huli Huli chicken pairs beautifully with neutral or slightly acidic sides. For a traditional Hawaiian plate lunch feel, serve it with a scoop of white rice and a creamy macaroni salad.
If you are looking for something with a bit more color, this chicken goes perfectly with yellow rice and black beans. The vibrant yellow rice provides a stunning backdrop for the mahogany chicken. For a lighter pairing, consider a crisp green salad or even some spinach stew for a unique fusion experience.
For dessert, keep the tropical theme going with bite-sized cheesecakes topped with a little leftover pineapple or a passion fruit drizzle.
Frequently Asked Questions
You can, but thighs are highly recommended for the best visual and flavor result. Thighs have a higher fat content and skin that can withstand the high-heat caramelization process required for the mahogany glaze.
The mahogany color comes from the combination of soy sauce, brown sugar, and pineapple juice reduced into a thick glaze. Using a cornstarch slurry ensures the glaze stays thick and translucent on the meat.
Traditional Huli Huli chicken is not spicy; it is savory, sweet, and tangy. The ‘heat’ comes from fresh ginger, which provides a bright aromatic kick rather than chili-based spice.
In Hawaiian, ‘huli’ means ‘turn.’ The recipe name refers to the traditional method of cooking the chicken on a rotisserie or turning it constantly over a grill to build layers of glaze without burning.
If your glaze is burning, your grill may be too hot or you aren’t turning the chicken often enough. Move the chicken to indirect heat and flip every 3 minutes to build the glaze safely.
Authentic Huli Huli Chicken Recipe Card
Huli Huli Chicken: The Ultimate Mahogany Glazed Hawaiian BBQ Thighs
Ingredients
Equipment
Method
- Whisk pineapple juice, soy sauce, brown sugar, ketchup, vinegar, ginger, garlic, and sesame oil. Reserve 1 cup. Marinate chicken in the rest for 4-12 hours.
- Simmer reserved marinade. Whisk in cornstarch slurry (1 tbsp cornstarch + 1 tbsp water). Cook until thick, glossy, and mahogany-colored.
- Preheat grill to 375°F. Place chicken skin-side down. Grill for 5 minutes until edges are charred.
- Flip chicken and brush generously with the thick glaze. Repeat flipping and basting every 5 minutes for 25-30 minutes.
- Grill pineapple slices until marked. Cook chicken to 175°F internal temperature. Give a final glaze coat before serving.
Notes
The high sugar content means you must flip often to prevent burning while building the glaze layers.
Capture the Spirit of Aloha at Home
Mastering Huli Huli Chicken is about more than just a recipe; it’s about the technique of layering flavor and texture through heat and patience. That bubbling mahogany glaze and the charred, crispy skin are the rewards for your attention to detail on the grill. This dish is guaranteed to be the star of your next BBQ, offering a visual appeal that is only matched by its incredible taste.
If you enjoyed this tropical journey, I would love to hear from you! Leave a comment below with your favorite grilling tips, and don’t forget to sign up for our newsletter for more elite-level recipes. You can also save this recipe to your “Summer Grilling” boards by following me at Pinterest.